


 David Permana | Sep 21, 2023
Optimizing Web Performance Part 1: Optimize Images
Tired of waiting for your websites to load? Or do you want to optimize your own website for faster loading times? Then you've come to the right place. In this tech blog, we will show you some tips on how to optimize your web performance so that your website can load faster.
Introduction
Before we begin, let's delve into page speed. Basically, page speed refers to how quickly your website's content loads when someone visits it. In today's world, speed is critical in almost everything. It doesn't matter if you have a visually appealing or complex web design; if your website takes forever to load, it won't cut it.
Why Is Page Speed Important?
When it comes to page loading speed, every second counts. Research indicates that when loading times increase from one to three seconds, the likelihood of visitors leaving immediately increases by 32 percent. In other words, if your pages can't load within a few seconds or take too long to display essential information, your visitors are likely to lose interest and exit your site.
Another reason why page speed is vital is because it can impact how people perceive you as the website owner and your brand. A slow and unreliable website can make you appear unprofessional, damaging your brand and costing you potential customers. Thus, improving your website's loading speed will have a positive impact on your traffic, user retention, and sales.
What Affects Site Speed?
The truth is, there are various reasons why your website may load slowly. Essentially, it could be anything, but the most common factors include:
- A poor server
- Large image sizes
- Hotlinking images or other resources from a slow server
- Slow network connection
- Not using browser cache
- Too many widgets or plugins
There are many things you can do to enhance your page loading times, which I may explain in the next part. In this tech blog, I want to focus on helping you test your page load time and optimize images on your website. According to HTTP Archive, one of the largest contributors to the average website's size is images, making them a significant factor in page loading speed.
How To Measure Page Speed?
Before we delve into optimizing your web performance, it's essential to assess the overall performance of your website. There are various tools available for testing and measuring page speed. However, I recommend starting with a basic one: Google PageSpeed Insights.
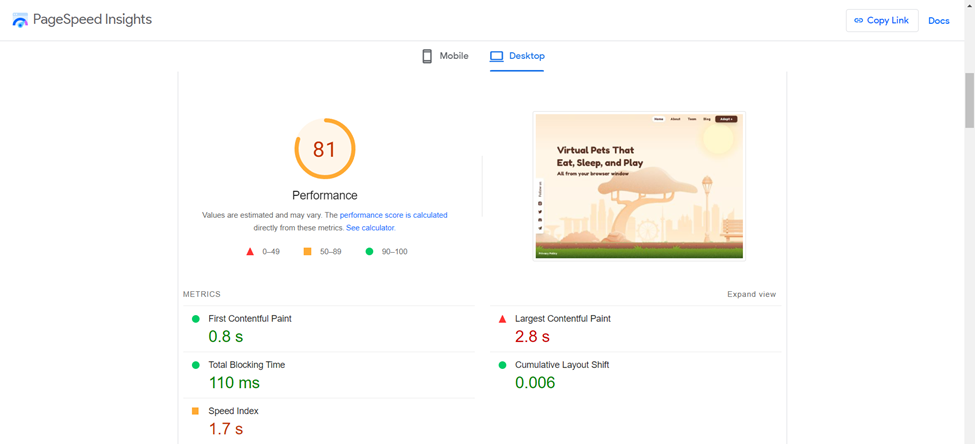
In the report, you'll find a range of performance metrics, such as the visual loading speed (Speed Index) and the time it takes for your page to become fully interactive. As you scroll down, you'll encounter a list of recommendations on how to enhance these metrics. Pay special attention if you come across suggestions like "optimize your images" or other image-related issues, as this blog will provide valuable insights on these topics.
Utilizing these tools to assess your site will undoubtedly highlight areas with potential for improving your web performance. Now, let's explore some straightforward steps to enhance your web performance by optimizing images.
Improve Page Loading Speed by Optimizing Your Images
Now that we both understand the importance of page loading speed and how to measure it, it's time to explore some simple yet effective methods to enhance your page loading speed through image optimization.
1. Resize Your Images
One of the easiest steps with a significant impact on page loading speed is often overlooked by developers—resizing your images to precisely match your website's requirements. However, I'm not referring to resizing images using CSS or in HTML.
For instance, if you have an image with dimensions of 8000x4500 pixels that you want to display on your website, but the required dimensions on your site are only 1000x560 pixels, it's crucial to scale down the original image to the required dimensions before integrating it into your website. Why? Because resized images are considerably smaller than the original ones and load much faster.
Here's an example:
<!-- Using this will load the full-size image, and the browser will perform the resizing -->
<img src="image.jpg" alt="full-size image" width="1000" height="560" />

<!-- Use the resized image, eliminating the need for browser-side resizing -->
<img src="resized_1000x560_image.jpg" alt="resized image" />
However, it's essential to consider a scenario where, after you've already incorporated perfectly-sized images into your website, you make layout changes that affect your image dimension requirements. Instead of generating new images each time your layout changes, you can find a close alternative, such as using a 1200x700px image if you need a 1000x560px image.
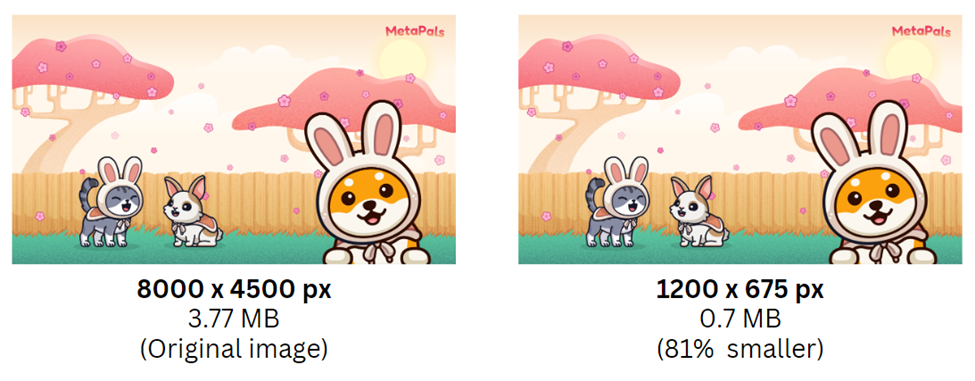
In the above example, I used an online image resizing tool which is iLoveIMG to highlight the difference between the original image's size and the one I resized to the desired dimensions. The size difference between these two images has the potential to significantly speed up your website and reduce your bandwidth consumption.
2. Compress Your Images
The second, and also one of the easiest, steps to boost page loading speed is to compress your images. As you know, images can enhance the appearance of your web pages and elevate the quality of your content. However, large images can also significantly delay and slow down your loading times.
Therefore, the second easiest way to optimize your web pages and improve loading times is to compress every image used on your website. Image compression can be achieved through either lossy or lossless methods. Lossy compression reduces image quality to achieve smaller file sizes, while lossless compression maintains image quality without any loss of data. Files compressed using lossy methods are smaller but may exhibit reduced quality, whereas lossless compression results in larger files but maintains the original image quality. Therefore, I recommend using lossless compression, as it compresses your images without any additional quality degradation.
A convenient way to compress your images is by utilizing online compression tools. Personally, I often use TinyPNG. It employs smart lossy compression techniques to reduce the file size of your images by selectively decreasing the number of colors in your image. After compression, it's challenging to discern any difference from the original image, but it makes a significant difference in the file size. Therefore, I highly recommend TinyPNG to help you compress your images.
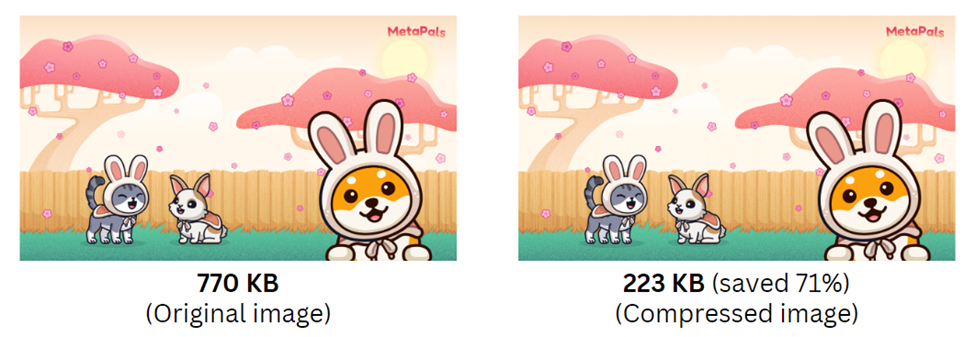
In the example above, I compressed an image using TinyPNG, which utilizes smart lossy compression techniques. It reduced the size by 71%, resulting in a total size of 561 KB. Can you spot any differences between the original image and the compressed one?
3. Choose The Right Image Format
The next step in speeding up your loading times involves selecting the appropriate format for every image on your website. This task can be a bit tricky, but it plays a crucial role in boosting your website's performance. JPEG, PNG, GIF, and SVG are the most common image formats used for websites. However, Google has introduced a new format called WebP, which works well with nearly all types of images and often provides better compression while maintaining the same quality.
WebP is a relatively new format that is supported by most modern browsers. However, due to its novelty, it may not work on some older browsers, and it is only partially supported on Safari. The best practice is to use the WebP format whenever possible and use other image formats like JPEG, PNG, GIF, and SVG as fallbacks. Here are some basic guidelines for each image format:
Image Format - Usage
- JPEG: Suitable for photographs, large background images, small banners, and images with complex color gradients.
- PNG: Similar to JPEG (with better quality but larger file sizes), ideal for images requiring transparency, graphics with sharp edges, graphics, logos, icons, and images with text.
- GIF: Suitable for simple animations (with optional transparency), web animations, and graphics with few colors (simple diagrams, shapes, logos).
- SVG: Ideal for vector graphics, logos, icons, and signs.
- WebP: Supports transparency, animations, and a wide range of color profiles.
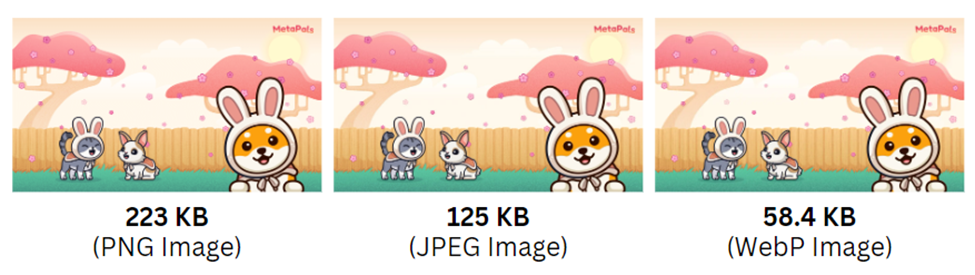
In the example above, I converted the same image into three formats using an online image converter which is CloudConvert. You can see the comparison between PNG, JPEG, and WebP images. The images are visually similar but have different sizes. Choosing the right format for each image you use will help you strike the best balance between image size and quality, ultimately reducing loading times. Keep in mind that the same picture in different formats will have varying file sizes.
4. Implement Lazy Loading For Your Images
Another highly effective step you can take to optimize your web performance is by altering how your website loads images. This technique can be especially valuable for certain types of websites, such as e-commerce or restaurant websites, which typically display numerous images on a single page. Lazy loading is a web optimization technique that progressively loads images on a website as the user scrolls or as the images become visible in the browser's viewport. Lazy loading helps reduce page load times and conserves bandwidth by loading images only when they are needed.
Here are some methods for implementing lazy loading:
- Using HTML: In HTML5, you can add the 'loading' attribute to your image tags to enable lazy loading. For example:
<img src="metapals.jpg" alt="MetaPals Background" loading="lazy">
- Using JavaScript: You can also implement lazy loading using JavaScript for more control. Here's an example:
// Select lazy-loaded images
const lazyImages = document.querySelectorAll('img[data-src]');

lazyImages.forEach((img) => {
  img.addEventListener('load', () => {
    img.removeAttribute('data-src'); // Remove data-src attribute after loading
  });
});

const lazyLoad = () => {
  lazyImages.forEach((img) => {
    if (img.getBoundingClientRect().top < window.innerHeight) {
      img.src = img.getAttribute('data-src'); // Load the image when it's in the viewport
    }
  });
};

window.addEventListener('scroll', lazyLoad);
window.addEventListener('resize', lazyLoad);
window.addEventListener('orientationchange', lazyLoad);

// Load initial images on page load
lazyLoad();
The example above illustrates the implementation of lazy loading, one of the most useful techniques for reducing loading times and improving the overall performance of your website. You're not limited to using just HTML or JavaScript; you can find lazy loading implementations for various JavaScript frameworks like Vanilla JS, React, Vue, Angular, and more.
Conclusion
The four easy steps listed above will not only decrease loading times on your website but also significantly enhance the overall user experience. Faster loading times and images contribute to a faster website in general. These implementations are basic and straightforward ways to optimize your web performance for faster loading times. Additionally, while tools, converters, and code implementations have been provided for each step, don't limit yourself to these options; you can explore and research to find the best implementation for optimizing your web performance.